
Basement Waterproofing vs. Finishing: Which One First?
Quick Answer: Waterproofing comes first, every time. Finishing a basement that still has a moisture problem seals water behind drywall and framing, where it feeds mold and rots the new work you just paid for. Confirm the basement is dry, fix any water source, then finish over materials that can handle the occasional damp day.
Why Moisture Control Has to Come First
A finished basement is only as good as the slab and walls behind it. Drywall, wood studs, batt insulation, and carpet pad all absorb water and hold it. Put those materials over a foundation that still lets moisture through, and you have built a sealed pocket that stays wet and dark. Mold needs exactly that: cellulose to eat, moisture to drink, and no airflow to dry it out. Within weeks you can grow a colony behind a wall you cannot see, smell it before you find it, and end up tearing out finished space to reach the source.
Skipping straight to finishing is a bit like painting over a rust spot on a car door. The color looks fine for a season, but the corrosion underneath keeps spreading until the panel fails from the inside. The paint did not stop the problem. It just hid it and bought the rust some privacy.
The order matters because water moves on its own schedule. Wetter months and snowmelt push the water table up and load the soil around your foundation, so seepage often shows in early spring. A high water table and warm, humid indoor air can keep a basement damp in the middle of summer just as easily. Moisture is a year-round tenant, not a seasonal visitor, which is why the fix has to be built in before the finished surfaces go up, not patched in after.
How to Read Your Basement's Moisture
Before any decision about finishing, spend time diagnosing what kind of moisture you have. The two big categories behave very differently. Condensation forms when humid air meets cool concrete, so the wetness sits on the surface. Seepage comes through the wall or slab from outside, so the wetness comes from behind. Telling them apart changes the whole plan.
Tape a two-foot square of clear plastic sheeting flat against a bare concrete wall or the floor, sealing all four edges, and leave it two or three days. Beads on the room side mean humid indoor air is condensing; moisture trapped against the concrete means water is coming through the foundation.
Efflorescence and staining: Look for a white, chalky, crystalline crust on the concrete, often near the floor or around cracks. That powder is efflorescence, mineral salt left behind as water passes through the masonry and evaporates. It is a fingerprint that liquid water has been moving through the wall, not just sitting on it. Dark tide lines and damp shadows low on the wall tell the same story.
The cove joint and wall cracks: Check the cove joint, the seam where the wall meets the floor slab, and any vertical cracks. Water pooling along that seam after wet weather points to hydrostatic pressure lifting water up through the joint from below. Weeping from a crack points to a specific breach. Both are seepage, and both need to be addressed at the source rather than sealed over from inside a finished wall.
Where Basement Moisture Actually Comes From
Naming the source is what turns guesswork into a fix. Most wet basements trace back to a short list.
Grading and surface water: If the soil slopes toward the house, rain runs down the foundation instead of away from it and soaks the ground right where you least want it. Ground that has settled over the years often forms a shallow bowl against the wall that funnels water straight down.
Gutters and downspouts: Clogged gutters and downspouts that dump at the foundation are one of the most common and most fixable sources. A single downspout emptying beside the wall can put hundreds of gallons into the soil next to your basement during one storm.
Hydrostatic pressure: When the water table rises, saturated soil pushes water against the slab and lower walls with real force. That pressure drives water up through the cove joint and through hairline cracks. This source is below grade and does not care how clean your gutters are.
Interior humidity: Not all basement moisture comes from outside. Unvented dryers, damp firewood, an uncovered sump pit, and warm summer air cooling against the walls all raise indoor humidity, which then condenses on cold surfaces. This is the source the plastic-sheet test isolates.
Fixing the Water in the Right Order
Solutions work best from the outside in, cheapest and least invasive first. Handle the easy sources before assuming you need excavation.
Start outside with grading and gutters: Regrade the soil so it falls away from the house for the first several feet, and extend downspouts well past the foundation. Cleaning gutters, adding extensions, and correcting a low spot in the grade are reasonable homeowner tasks and often cut incoming water dramatically. Do this first and re-test before spending on anything larger.
Interior drain tile and a sump: When hydrostatic pressure is the culprit, the standard fix is an interior perimeter drain, a channel of drain tile set in gravel along the footing that collects water at the cove joint and routes it to a sump pit, where a pump lifts it out and away. This is a professional installation that involves cutting the slab, and it is the reliable answer to a high water table.
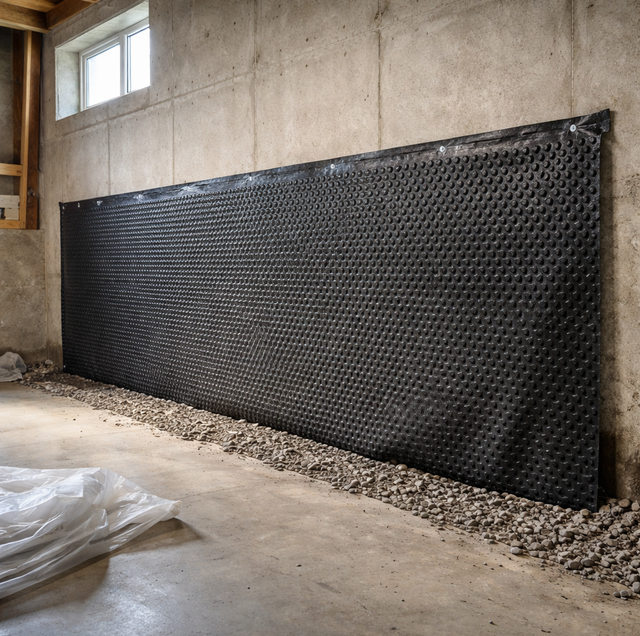
Vapor barriers against the wall: A dimpled drainage membrane or vapor barrier against the foundation gives any residual moisture a defined path down to the drain instead of into your framing. It is what separates a wall system that tolerates a damp foundation from one that soaks it up.
Dehumidification for the air: Once liquid water is controlled, a dedicated basement dehumidifier holds indoor humidity in a range that discourages mold. Aim to keep relative humidity under about 60 percent. A dehumidifier is a homeowner-friendly tool and a fair DIY step, but it treats humid air, not active seepage, so it is the finish line, not the whole race.
A safety note before you touch anything: standing water anywhere near outlets, the furnace, or the electrical panel is a shock hazard. Do not wade in. Kill the power to that area at the panel only if you can reach it dry; otherwise, call a professional. Active mold beyond a small surface patch, and any structural or foundation repair, are pro jobs too.
How to Finish a Basement So It Stays Dry
Once the basement passes its moisture tests over a full wet stretch, finish in a way that respects where you are building. Below grade is a damp environment even when it is dry, so material choice is doing quiet work.
Favor moisture-tolerant materials. Consider inorganic or paperless products in place of standard paper-faced drywall, rigid foam board rather than paper-faced batts against exterior walls, and a subfloor system that lifts the finish floor off the cold slab so any stray moisture has somewhere to go. These choices do not invite a flood, but they survive the occasional damp day without feeding mold.
Leave access. Build removable panels or an access door at the sump pit, main cleanout, and any shutoff or foundation crack you are watching. A finished basement that seals those points away trades a small inspection today for a demolition tomorrow. The best finished basements are the ones you can still get behind.
When to Bring in a Professional
Handle the assessment and the light work yourself: run the plastic-sheet test, clean and extend the gutters, correct the grading, and run a dehumidifier. Bring in a professional the moment the water is coming from below or the fix goes structural. Recurring cove-joint seepage, water under pressure, cracks that weep, mold past a small patch, and the interior drain tile plus sump system are all specialist work, both for safety and because the finished space riding on top has to be trusted for years. A contractor who waterproofs and finishes together can sequence the whole project so the dry-out and the buildout line up instead of fighting each other.
Frequently Asked Questions
Give it at least one full wet stretch of weather, and ideally a rainy spring, so the system gets tested under a raised water table before you close the walls. Fresh concrete from any patching also needs time to cure and release its own moisture, which can run 30 days or longer for the slab to give up construction moisture. Re-run the plastic-sheet test at the end of that window before you commit to drywall.
Both exist, and they solve different problems. An exterior French drain sits in a trench beside the footing outside and intercepts water before it reaches the wall, which usually means excavating down to the footing. An interior perimeter drain sits under the slab edge inside and collects water that has already reached the cove joint. Exterior is more disruptive to install but stops water sooner; interior is common in finished-basement projects because it does not require digging up the yard.
No, and relying on one is a common misread. A dehumidifier only pulls moisture out of the air, so it manages condensation and humidity but does nothing about liquid water entering through the slab or walls. If the plastic-sheet test showed moisture trapped against the concrete, a dehumidifier will run constantly and never win. Size it to the space and pair it with a drain if seepage is present.
The powder itself is harmless mineral salt and wipes off, but treat it as a warning light, not a stain to ignore. It confirms liquid water is passing through the masonry and evaporating on the surface. Painting over it with ordinary paint traps that moisture and the paint peels within a season. Identify and correct the water path first, then finish.
Mold generally needs sustained relative humidity above roughly 60 percent at the surface to take hold, so keeping basement air below that is the practical target, with 40 to 50 percent being a comfortable range. A cheap hygrometer placed low in the room, where cool air settles, tells you where you actually stand. Readings tend to spike in humid summer air, which is exactly when a dehumidifier earns its keep.
Hanging a wall vapor barrier or dimpled membrane on a foundation that has already been proven dry is within reach for a confident DIYer, since it is largely fastening and taping. The catch is that a vapor barrier over a wall that still leaks makes things worse by hiding the water, so the honest prerequisite is a clean set of moisture tests. If seepage is still present, the barrier is part of a larger drainage system a pro should design, not a standalone weekend fix.
Book a basement moisture assessment before you frame a single wall — get a dry, finished space that lasts. M&D Home Renovations serves Delaware County and the Philadelphia suburbs. PA HIC #PA171802. Call (484) 250-4883.
