
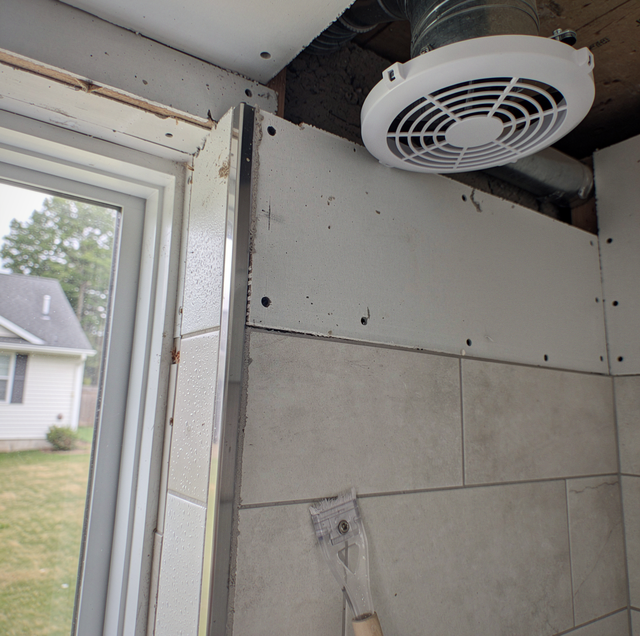
A remodel gives you a clean slate: new tile, new fixtures, new paint on walls that used to show water stains. But a bathroom that looked spotless on installation day can start showing the same dark spots in the grout lines within a year if the moisture side of the job never got addressed. Mold needs three things to grow: a food source (soap film, drywall paper, dust), a surface to grow on, and sustained moisture. A remodel can remove or reduce two of those three, but only if the ventilation, materials, and sealing were handled with that goal in mind, not just as an afterthought to the tile pattern.
Older bathrooms carry some extra risk here. A house built decades ago often has a bathroom vent that was sized for a much smaller room, or ductwork that dead-ends in the attic instead of running to the outside. Framing behind the walls may have absorbed moisture for years before anyone noticed. None of that has to repeat itself after a remodel, but it does mean the moisture-control steps deserve as much attention as the finish choices. Below is what actually keeps mold from coming back, broken into the parts you can control.
Get the Exhaust Fan Sized and Vented Correctly
The single biggest factor in whether a remodeled bathroom stays mold-free is whether the exhaust fan actually removes humid air from the room, fast enough and to the right place.
Sizing: A fan rated for a much smaller room than the one it's installed in will run the whole shower and still leave the mirror fogged and the air heavy. A common baseline is 1 cubic foot per minute (CFM) of airflow per square foot of floor area, with an additional allowance for a separate tub or a showerhead positioned away from the fan. A bathroom with a soaking tub, an oversized shower, or two showerheads generally needs more capacity than a single-fixture layout, and a contractor sizing the job should run that math against the actual room, not just install whatever fan was in the last bathroom.
Venting: Sizing only matters if the ducting takes the moist air outside. A fan that vents into the attic, into a soffit that recirculates air back toward the roofline, or that just dumps into an unfinished space between floors is doing almost nothing for the room below it. It's actively adding moisture to a space that wasn't built to handle it. Older homes are especially prone to this shortcut, since a bathroom added or updated years ago may never have gotten a proper duct run to an exterior wall or roof cap. Confirming that the vent terminates outside and that a damper closes when the fan shuts off is worth checking during any remodel rather than assuming the existing ductwork is fine.
Habits: A fan that's sized and vented correctly still needs to run long enough to matter. Running it during a shower and for a solid 20 to 30 minutes afterward clears the humidity that would otherwise settle on cool surfaces and linger. A timer switch or a humidity-sensing fan control solves the common problem of someone forgetting to flip it off, or turning it off the moment they leave the room while the mirror is still dripping.
Choose Materials That Don't Give Mold Anything to Feed On
Behind the tile and under the paint, the material choices made during a remodel matter as much as the finish itself.
Backer board, not standard drywall, behind tile: Cement board, fiber-cement board, or a foam-core waterproof panel system is built to handle direct water contact behind a tub or shower wall. Standard drywall, even the "green board" moisture-resistant type, is only mildly water-resistant and isn't rated for direct wet-area contact behind tile. Using the wrong backer in a wet zone sets up exactly the slow, hidden water absorption that shows up as mold and soft spots years later, often behind a wall that looks perfectly fine from the room side.
A real waterproofing membrane, not just backer board alone: The board itself isn't the waterproofing layer; a liquid or sheet membrane applied over the board (and, in a shower, at the pan and corners) is what actually keeps water from reaching the framing. This detail is often skipped, even though the tile still looks fine on installation day, even when the underlying membrane is missing or incomplete.
Mold-resistant paint on ceilings and upper walls: Standard interior paint lacks the additives that resist mold growth on surfaces that regularly experience high humidity. A paint formulated for bathrooms and other damp rooms includes mildewcide additives that make the painted surface far less hospitable to mold spores landing on it, particularly on ceilings, which take the most direct hit from rising steam.
Grout and caulk for wet areas: Standard sanded or unsanded grout is porous by nature and will absorb moisture over time unless sealed; epoxy grout resists moisture and staining without ongoing sealing, which matters most in a shower or around a tub. Silicone caulk, not the cheaper acrylic latex type, belongs at every wet-to-wet joint, since it flexes with the material movement a bathroom experiences and resists mold growth better than latex over the long run.
Keep the Seals Doing Their Job Long After the Remodel Is Done
Materials and ventilation solve most of the problem on installation day, but caulk and grout are wear items, not permanent fixtures, and skipping their upkeep is one of the most common ways a mold-free remodel stops staying that way.
Walk the shower and tub perimeter every few months and look for caulk that's pulling away from the tile, cracking, or turning a dull gray-yellow instead of staying white or clear. Any gap, even a hairline one, gives water a path behind the wall assembly, right past the waterproofing installed to prevent exactly that. Recaulking a joint means removing the old bead completely (a plastic scraper works better than a blade to avoid scratches), letting the area dry fully, then applying a fresh bead of 100 percent silicone caulk rated for bath and kitchen use.
Grout lines deserve the same periodic check. Hairline cracks in grout, or grout that feels soft or crumbly when pressed with a fingernail, mean water is likely getting past the surface layer. Reapplying a grout sealer roughly once a year to cement-based grout (epoxy grout doesn't need this step) keeps the surface less absorbent between deeper maintenance.
None of this is heavy work, but it's easy to let slide, since a bathroom can look completely fine on the surface for a long stretch even after a seal has started to fail underneath.
Build Humidity Habits Into the Daily Routine
Even a well-vented, well-built bathroom accumulates moisture faster than almost any other room in the house, and the daily habits around that moisture matter nearly as much as the fixed systems.
Run the exhaust fan during every shower or bath and for a while after, as covered above. Leave the shower door or curtain open partway after use rather than sealed shut, so trapped humid air inside the enclosure has somewhere to go instead of sitting against the tile and glass. Wipe down glass shower doors and tile walls with a squeegee after the last shower of the day; this single habit removes much of the standing moisture that would otherwise slowly evaporate over hours, keeping the room humid the whole time. Keep the bathroom door open when it's not in use so air can circulate and dry any lingering dampness, rather than trapping it in a closed, humid room.
In the colder months, keeping the bathroom reasonably warm helps too, since condensation forms fastest where warm, moist air meets a cold surface. A cold exterior wall or an uninsulated bathroom window that's otherwise heated normally becomes a magnet for condensation. That condensation behaves much like a slow leak to the wall assembly.
When Mold Keeps Coming Back Anyway
If the fan is properly sized and vented outside, the materials behind the tile were installed correctly, the caulk and grout are in good repair, and the daily habits are solid, and mold is still returning in the same spot, that's a signal worth taking seriously rather than a reason to just scrub harder. A moisture source that ordinary ventilation and cleaning can't reach, a slow plumbing leak inside a wall, a waterproofing membrane that failed at a seam, or condensation forming inside a wall cavity where warm indoor air meets cold framing needs to be found and fixed at the source. Repeated mold in the same location after a properly done remodel is not typical, and it's a reasonable point to bring in someone who can open up the area, check behind the surface, and identify what's actually feeding it, rather than continuing a cycle of cleaning and repainting over a problem that hasn't gone away.
Frequently Asked Questions
Mold showing up within the first few weeks after a remodel, especially in a spot that was freshly installed, usually points to a construction issue: a missed waterproofing step, a fan that isn't actually venting outside, or materials that got sealed in while still damp. It's worth flagging early rather than waiting to see if it clears on its own.
No. Mold-resistant paint helps a surface resist growth, but it doesn't remove excess moisture from the air or fix a ventilation problem. It works best as one layer of protection alongside a properly sized exhaust fan and good humidity habits, not as a standalone fix.
An oversized fan generally isn't a mold risk the way an undersized one is, though a fan that's dramatically larger than needed can pull conditioned air out of the house faster than necessary and add to heating and cooling costs. Matching the fan to the room's actual size and fixture count is the more useful goal than simply going as large as possible.
Not reliably. A window helps when it's actually open, but many people forget to open it, and in cold or wet weather it often stays shut. An exhaust fan vented to the outside works regardless of the season or habit, which is why building codes and manufacturers still call for one, even in bathrooms with operable windows.
Surface mold on grout or caulk wipes away and doesn't return quickly if the underlying moisture problem is under control. Mold growing behind tile is harder to spot directly, but a musty smell that doesn't fade, discoloration spreading beyond the grout lines, or tile that feels slightly soft or sounds hollow when tapped are signs that the problem may be deeper than the visible surface.
Some darkening from soap residue, water minerals, and general use is normal and isn't the same as mold, which tends to show as distinct dark spots rather than an even, gradual shift in color. A grout sealer reapplied periodically helps slow ordinary darkening, while spotty, spreading discoloration is more likely biological growth worth addressing directly.
Schedule a bathroom remodel built around moisture control from the studs out — proper venting, backer board, and sealed wet areas done right the first time. M&D Home Renovations serves Delaware County and the Philadelphia suburbs. PA HIC #PA171802. Call (484) 250-4883.
